In this lab, we'll create a small spreadsheet for a purpose your instructor
knows fairly well: keeping track of grades.
The data in this spreadsheet will be entirely invented, so have
fun making things up.
Note: You should see images at the right to illustrate some of the steps. If you don't see them, you might want need to switch browsers. I've had some trouble in the past with such constructs in IE, though this page looked okay when I tested it with IE 7.
 Open the Excel program under Microsoft Office.
(If you have another spreadsheet program, you can probably still use
these instructions, so long as you're willing to be a bit flexible and
adapt to some minor differences.)
Open the Excel program under Microsoft Office.
(If you have another spreadsheet program, you can probably still use
these instructions, so long as you're willing to be a bit flexible and
adapt to some minor differences.)
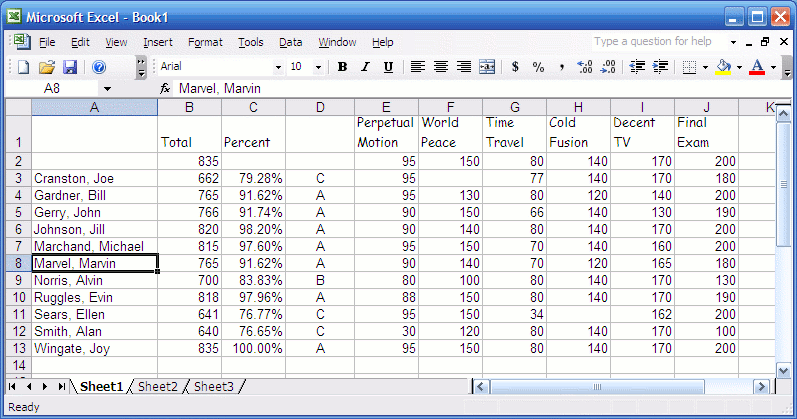
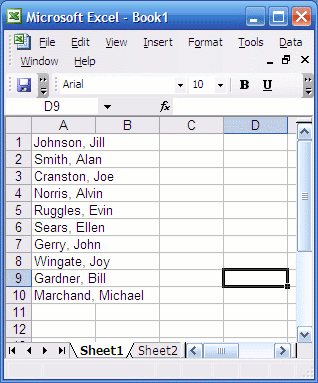
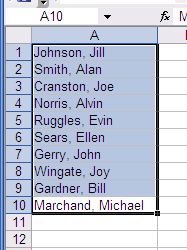
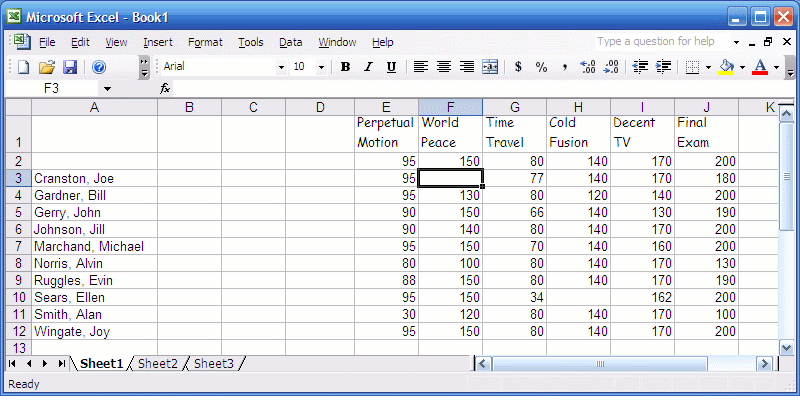
- In column A, enter ten student names. Make up whatever names you like, within reason. Enter them in a column from that top (A1, A2, etc). Enter each as Last, First.
- Widen the column to accommodate the longest name. On the top row where the column letters appear, point to the divider between A and B. The cursor will change to show left and right arrows. Click, and drag the divider so that the left column is wide enough for all the names.
 Select the region containing the names. Click on one, and drag to
select them all.
Select the region containing the names. Click on one, and drag to
select them all.
- Select Data/Sort, and sort the data using the default settings.
The names will now be alphabetical.
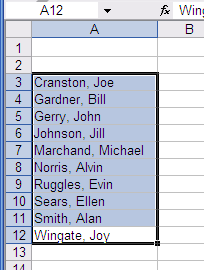 Now, suddenly remember that you wanted to add two rows of extra
information at the top. With the region of names still selected (or selected
again), move the cursor to the
bottom edge of the selected area. It will change
to show four small arrows in the for directions (like a compass), with
a large white arrow on top. (You'll know it when you see it.)
When you get the cursor this way, click and drag the selected area down
two rows, so it now occupies A3 to A12.
Now, suddenly remember that you wanted to add two rows of extra
information at the top. With the region of names still selected (or selected
again), move the cursor to the
bottom edge of the selected area. It will change
to show four small arrows in the for directions (like a compass), with
a large white arrow on top. (You'll know it when you see it.)
When you get the cursor this way, click and drag the selected area down
two rows, so it now occupies A3 to A12.
- Enter some titles for your assignments. This time remember to leave some space for what comes later, and enter the first title in E1. Choose a long title that contains at least two words, and won't fit in the width of a row.
- Click on the E1 cell which contains your title. Click on the Format menu, and select Cells. Click on the Alignment tab and click Wrap Text box.
- The row should widen to allow your title to fit on several lines. If not, widen it as you did column A. Also widen E if needed.
- Invent five more interesting multi-word project names, and enter them in F1 through J1. Widen rows and columns as needed.
 Select the six titles, and select an interesting font from the
font pull-down.
Select the six titles, and select an interesting font from the
font pull-down.
- In E2 through J2, enter the maximum possible scores for each assignment. Make them up, but stay between 10 and 200, and don't make them all the same.
- Select the row of maximum scores, and copy it. (You'll see the dancing dashes around the border of the selection when it's been copied.)
- Select the area below the maximum values and right of the names (from E3 to J12), then paste. This will give each student the maximum score on each assignment.
-
Now, change some individual scores so that not everyone has all
the points. Maybe even delete a few scores. Try to make sure that
each student has a different total. Don't give scores which are larger
than the maximum for that assignment.
- Insert into B2 a formula which takes the total of all the maximum scores: the area from E2 to J2.
- Copy this formula to each of the B3 through B12. You should see a total for each student.
- Now, in column C we want to display the percentage for each
student. We'll do this in several steps.
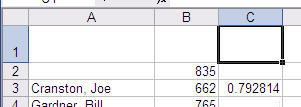 Create a formula in C3 to compute the ratio for the first student
in the list. Use this:
=B3/B$2This should show a ratio (not a percentage) for the first student.
Create a formula in C3 to compute the ratio for the first student
in the list. Use this:
=B3/B$2This should show a ratio (not a percentage) for the first student.- Now, copy this formula down for all the students. They should each have a ratio.
- Click on cell C6 and examine the formula there. Notice that the B3 has changed to B6, but the B$2 has stayed the same. This is what the dollar sign is for. It makes an absolute reference to B2; one that doesn't change when you move or copy it. This is important, since we want the fraction of the maximum score, not the faction of the score for the student on the previous row.
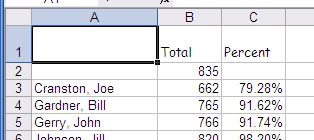 Select the cells which contain the ratios (C3 through C12).
Click on the Format menu, choose Cells, and select the Number tab.
Choose Percentage. The cells will now display as a percentage.
This doesn't actually change the values in the cells, only the way
those values are displayed.
Select the cells which contain the ratios (C3 through C12).
Click on the Format menu, choose Cells, and select the Number tab.
Choose Percentage. The cells will now display as a percentage.
This doesn't actually change the values in the cells, only the way
those values are displayed.
- Go ahead and add headers for the total and percentage columns in B1 and C1. (I left mine aligned to the left, as you can see, but they might look better on the right.)
- Finally, we can create a formula to show the letter grade based
on the percentage. We'll take this one in steps.
- Enter the following formula in D3:
=IF(C3>=0.9,"A","less")Copy it down through the rest of column D. The IF function chooses one of two values based on a condition, much like the if statement in Python. This one tests to see if the percentage in C3 is at least 90, and assigns an A, otherwise it assigns the grade “less”. If all your students have 90% or better, change one or two to have less. Check that all students with 90% or better show A, and the others show less.
Note that the the comparison is with the ratio, 0.9, not the percentage number 90. This is because the percentage cells actually contain ratios; they are only formatted to display them as percentages.
- Just as Python if's can be nested, so can the IF function.
Change D3 to
=IF(C3>=0.9,"A",IF(C3>=0.8,"B","less"))Copy this to the other cells in column D. Make sure the correct name appears.
-
Now, place the final formula in D3, and copy it down. The final,
rather cumbersome formula is:
=IF(C3>=0.9,"A",IF(C3>=0.8,"B",IF(C3>=0.7,"C",IF(C3>=0.6,"D","F"))))This beastie checks the threshold for each letter, and chooses the correct one.
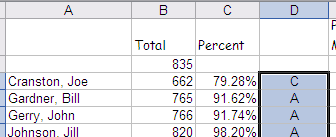 For appearance, center the letters in their column. Select the
the column, and choose the center button on the tool row, or use
Format/Cells/Alignment and choose to center horizontally.
For appearance, center the letters in their column. Select the
the column, and choose the center button on the tool row, or use
Format/Cells/Alignment and choose to center horizontally.
- Enter the following formula in D3:
- A new student, Marvin Marvel, joins the class. You have to add him in
the middle of the list. (If your names are such that Marvel doesn't
fall in the middle, pick a name which does.)
- Point to the line number below where Marvin goes. Not a cell, but the the line number to the left of the A column.
- Right click, and select insert. This will add a row.
- Add Marvin's name to the A cell of the new row, and Copy the the B,C and D cells from any student's row to Marvin's.
- Fill in some scores for Marvin.
- When you have finished, save your changes, close the spreadsheet, and submit it here.