Mississippi College
Computer Science 114
This lesson looks at the basics of processing digital images using Python. Digital images are arrays of dots, called pixels, the small points of color which make up an image. We will manipulate the pixels one at a time to change the appearance of the image. Note that Python is rather slow for this kind of application. Serious image processing applications are usually written in a language such as C, which is designed more for execution speed than programmer convenience. However, such programs do exactly the same sorts of computation as we will perform.
Instead of beginning by starting Idle, download the following test images.

To download, right click and select save target or save image. The test images are small since Python tends to be slow at this, as noted above. They are GIFs, since that's what our example tool reads. You may save them anywhere you like, but remember the location since you'll have to find them again.
Now, download this Python program
imdisp.pywand save it on your desktop. Again, right click and tell the browser to save the target.Okay, I was just putting it off. Start Idle, as before. This time, though, use the file menu to open the file
imdisp.pywyou saved in the last step.Run the program. You will see a window appear with a standard File menu at the top, an empty area, and six buttons at the bottom. Use the File menu at the top to Open the image
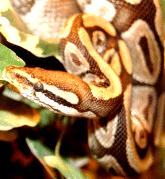
Python_royal_35.gifwhich you downloaded earlier. It will appear in the window, though not all that quickly.Press the Brighter button. After a short delay, the picture will get brighter. Try this a couple of times.
Press any of the other buttons. You'll just get a dialog box noting that this function is not yet implemented.
This program uses a number of Python features which we have not discussed. For the purposes of this lesson, most of this program will remain a mystery. But feel free to look at it all you like for your own enlightenment. The portion we will work with in this lesson starts near the bottom of the file, beginning with the comment that says
START HERE. It looks like this:#
# *********************** START HERE *****************************
#
# Pop up a not implemented warning.
def sorry():
showwarning("Not Implemented",
"Sorry, this function is not yet implemented")
# Create and grid a button for the image modification functions.
def mkbut(r, c, lab):
ret = Button(bgframe, text=lab, command=sorry,
bg=bgcolor, activebackground=abgcolor)
ret.grid(row=r, column=c, sticky='news')
return ret
# Here are the six function buttons. Initially, they simply pop up the
# warning that they are not implemented.
lighten = mkbut(1, 0, 'Brighter')
contr = mkbut(1, 1, 'Contrast')
bandw = mkbut(1, 2, 'Blk & White')
flip = mkbut(2, 0, 'Flip')
pxled = mkbut(2, 1, 'Pixelized')
red = mkbut(2, 2, 'Red')
# The image is stored in a object called pic. The image is stored in an array
# of pixels inside pic. Refer to any particular pixel as
# pic.idat[row][column] where row and column are numbered from 0 up to, but
# excluding, pic.width() and pic.height(). The pixel has parts r, g and b
# which are color values from 0 to 255, which you may reference or change.
# When you are done, you must call pic.sync() to make your changes effective.
# Here is the implementation for the lighten function.
def dolighten():
for row in range(0, pic.height()):
for col in range(0, pic.width()):
p = pic.idat[row][col]
p.r = min(p.r + 30, 255)
p.g = min(p.g + 30, 255)
p.b = min(p.b + 30, 255)
pic.sync()
lighten.configure(command=dolighten)
root.mainloop()The program again uses
Tkinter. The functionmkbutis used to create each of the buttons at the bottom of the window. Each one is created with standard colors, with text and location sent as parameters. This is done with the six calls tomkbutwhich follow the function definition. Each is created with the command functionsorry, which merely shows a window indicating that this function is not implemented. You will see this message if you click any button besides Brighter.Following the button creation is the actual implementation of the Brighter button. The function
dolightenperforms the operation, and the call tolighten.configureassigns this new command function in place ofsorry. Push the Brighter button to see what it does. Push it again. If you want the original image back, you can open the file again. The buttons only change the the displayed version.The Brighter button does just what it says: It makes the picture brighter. The image is stored in an object called
pic. The picture is a two-dimensional array of pixels. Its size in pixels is described bypic.height()andpic.width(). Any particular pixel can be accessed bypic.idat[r][c], where r and c are the row and column number. Each can be any integer expression, ranging from 0 topic.height()-1 andpic.width()-1, respectively. We used subscripting in Lesson 2 and Lesson 3 to select individual characters from a string. We are applying the same operation here to select pixels out of an image. Very often, we access the pixels with a double loop of the sort you see indolighten. The outerforgoes through each legal row number. For each row, we go through each legal column number. Inside the two loops, the program generates each possible pair of row and column numbers, and therefore refers to each pixel. The body of the doubleforloop, then, is executed exactly once for each pixel in the image.Each pixel has three parts,
r,gandb, for red, green and blue. Each is an integer value from 0 to 255 indicating how brightly that particular color is turned on. You can access and change these values, as shown here. Consider the loop body indolighten. First,p = pic.idat[row][col]gets the pixel for this iteration and places itp. Then,p.r = min(p.r + 30, 255)increases the red level by 30, but not more than 255. Thep.ris just an integer variable that is part of the pixelp. We could almost use insteadp.r = p.r + 30The only reason we don't is to avoid producing a result exceeding 255. The builtinminfunction returns the lower of its two arguments. If the sump.r + 30is less than 255,minreturns that. If it is more,minreturns 255. We then do the same thing for green and blue.Finally, you must say
pic.sync()before the changes you make actually appear on the screen.*A. Ruin Your Image
Change each pixel assignment indolightento eliminate themax. That is, change the first one fromp.r = min(p.r + 30, 255)top.r = p.r + 30and make the similar change to the other two components. Run the program and press the Brighten button to see what happens. The results are interesting. Then restore the assignments so the program operates correctly.B. Improve Your Image
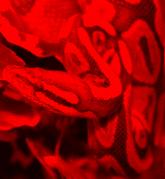
Implement the remaining five buttons (or whichever of them your instructor designates). Each solution will have a form similar to the example implementation of Brighten. For each you must write an implementation function; choose a new name for each one. Then bind it to the correct button b with a b.configure()statement. The implementations vary somewhat in difficulty.- Implement the Red button. This button eliminates all color from the image except red. It is fairly simple: Go through each pixel as the Brighten button does, and set the green and blue components to zero (turn them off).
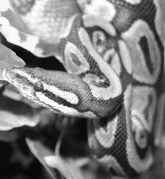
- Implement the Blk & White button. As you can see, this produces a black-and-white version of the image. In a black-and-white picture, each pixel is black, white, or some shade of gray in between. This means that the three components of each pixel are equal. To compute your black-and-white picture, go through each pixel, compute the equivalent gray value, and assign that (same) value to each component. The standard way to compute the gray value is to take 0.299 times the red, plus 0.587 times the green plus 0.114 times the blue. These numbers come from video standards, and estimate the difference in apparent brightness between the colors.
- Implement the Contrast button.
This button attempts increase the contrast in the image by spreading out
the range
of pixel values. For each component of each pixel, apply the following
rules.
- If the value is less than 30, change it to zero.
- If the value is more than 225, change it to 255.
- Values c in the range 30 to 225 should be scaled to the range 0 to 255
by this Python formula:
int((255.0 / 195.0) * (c - 30) + 0.5)The
intbuiltin function converts from floating point to integer by discarding the fractional part. As you can see (perhaps with the help of a calculator), a component of 30 becomes 0, and 225 becomes 255. Smaller values are reduced: 45 becomes 20; larger ones are increased: 180 becomes 196. Middling values are changed little: 120 becomes 118. The ratio 255/195 is the maximum pixel value you want divided by the maximum value of c - 30. Adding 0.5 is a very old trick to get theintfunction to round to an integer. (If you don't believe it, try a few.) You might want to create an extra function to perform this mapping, then your loop body can call it in three places, one for each color component.
- Implement the Flip button.
The flip button turns the picture upside-down. It does this by
exchanging pixel values. Each pixel in row zero must be exchanged
with the one below it in row
pic.height()-1. Pixels in row 1 must exchange with pixelspic.height()-2, and so forth. You can write aforloop likefor row in range(0, pic.height()/2)which will go through the first half of the rows. The pixels in eachrowmust then be exchanged with those inpic.height() - row - 1. In Python, you can exchange two values with an assignment likea, b = b, a - Implement the Pixelized button.
This is the most difficult of the buttons.
The problem is to divide the image up into squares of ten
pixels on each side. At the lower and right edges, some of these
"squares" are not really squares at all; they are smaller because
otherwise they would extend past the edge of the image.
Within a square, each component of each pixel must be set to
the average value for the square. You will want to set an
outer loop which goes through the pixels, and two inner loops,
one to compute averages and one to assign new pixel values.
Here's a skeleton of the loop you need:
# Go through the upper corner of each square.
for rrow in range(0, pic.height(), 10):
for rcol in range(0, pic.width(), 10):
# Do some initialization here.
# Go through the pixels in the square.
for row in range(rrow, min(rrow + 10, pic.height())):
for col in range(rcol, min(rcol + 10, pic.width())):
# Add up each component, and count the number
# of pixels
# Find the average value for each component.
# Go through the square once again.
for row in range(rrow, min(rrow + 10, pic.height())):
for col in range(rcol, min(rcol + 10, pic.width())):
# Assign the average to the pixel.
Red Blk & White Contrast 

Flip Pixelized Try your operations on each of the test images to see what happens. Photoshop is a tad more complex, but makes the same kinds of calculations you are making.
Try applying some of your operations multiple times. Except for Flip, once you have applied the operation, you cannot get your original image back, except by reloading it from the file. Could you create buttons to undo the other transforms without keeping a copy of the original image around? Could you create a Darker button that would always exactly reverse the Brighter button?
Computers are high-speed detail artists. An image is manipulated by doing many fairly simple calculations over and over for each pixel in the image. The human mind sees a whole image, but the computer only "looks" at one pixel at a time. This is also the primary difficulty of programming. The computer executes many small instructions quickly, but it has no sense of what the program does. It is the programmer who must make the connection between the program and its parts. And that can be a challenge.
*This last step is needed
because pic.idat is actually a copy of what is displayed on
the screen, not the screen data itself. You code updates the idat copy,
and the sync method copies idat to the display area.
The reason why this is needed is much longer than this footnote.
Copyright 2005, 2006
Thomas W Bennet •
Image Credits
•
Terms of use:
Creative
Commons