In this lab, we'll use the the image tool to create two simple
manipulators. You will need to download
image manipulator program if you don't have it.
Here also are some images to practice on. Download a few as you like.
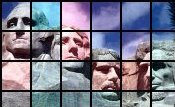
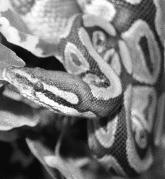 Now, for the two modifiers. The first one is to compute a black and
white version of the picture. The image at right shows the
black-and-white snake.
In a black-and-white picture, the three levels of each pixel are
the same.
The modifier has the job that, for each pixel, it must set each of
the three levels to an average value. The simplest choice for a
gray value is:
Now, for the two modifiers. The first one is to compute a black and
white version of the picture. The image at right shows the
black-and-white snake.
In a black-and-white picture, the three levels of each pixel are
the same.
The modifier has the job that, for each pixel, it must set each of
the three levels to an average value. The simplest choice for a
gray value is:
gray = (r + g + b) ÷ 3 = 0.333r + 0.333g + 0.333b
(The mathematicians will note that it isn't really equal, since 0.333 is not
really one third. But there's no difference you could ever see.)
It turns out, however, that that is not the best formula. Since the human eye
perceives the brightness of different colors differently, it is better
to weight the three components differently. The following formula
comes from the television technical standards:
gray = 0.299r + 0.587g + 0.114b
This means that, at least according to the TV industry, an increase in the
green contributes somewhat
more brightness than the same increase in red or in blue.
So, here's what you need to do. Review
the introduction for more
details.
- Create a new modifier button. Name it something appropriate, such
as BW.
- Right click the button and edit the modifier.
- At the top of the body of each_pixel, make a single new line
containing this assignment
statement to compute the gray level:
gray = 0.299*pix.r + 0.587*pix.g + 0.114*pix.b
The * indicates multiplication, since there's no × on
the keyboard.
This new line computes the gray level, and creates the new variable
gray to hold the value.
- Next, change each of the assignments to the colors so that each
color is assigned gray. That way, each component will be set to
the proper gray level.
- Save the modifier and try it. If you apply it to the snake
image, you should get the picture shown above right.
- If you don't get the right image, or if you get error messages
when you try to save or run your modifier, you will need to edit it
again. If you need to get the original image back, use the Reload
item under File.
Work with your modifier until it is correct.
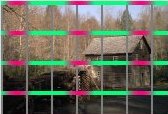
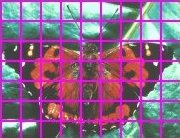 Your second modifier will put the picture behind a violet grid.
The butterfly is caged at the right. We'll take this one in
three steps. First, create a modifier button called Grid. Edit
the modifier so that each pixel has red and blue set to 255, and
green set to zero. Your button will simply turn the entire
picture this color.
Your second modifier will put the picture behind a violet grid.
The butterfly is caged at the right. We'll take this one in
three steps. First, create a modifier button called Grid. Edit
the modifier so that each pixel has red and blue set to 255, and
green set to zero. Your button will simply turn the entire
picture this color.
The second steps changes the modifier to produce vertical bars, rather
than turning the whole picture violet.
To understand how this is done, we need to consider the uses of the
remainder. The remainder, of course,
is what's left after you perform a division, and cannot subtract the
divisor again. (Later on math, it gets a bigger office and a new
title: “modulus”. But it's the same old leftover bit.)
Now, consider the following diagram.
| col | 0 | 1 | 2 | 3 | 4 | 5 | 6 | 7 | 8 | 9 | 10 | 11 | 12 | 13 | 14 | 15 | 16 | 17 | 18 | 19 | 20 | 21 |
| col mod 8 | 0 | 1 | 2 | 3 | 4 | 5 | 6 | 7 | 0 | 1 | 2 | 3 | 4 | 5 | 6 | 7 | 0 | 1 | 2 | 3 | 4 | 5 |
| | | | | | | | | | | | | | | | | | | | | | |
The first row shows the column number, and the second shows the
col mod 8, which the remainder after dividing the column number
by 8. Notice how the remainder values repeat as you move
left-to-right along the line. We can use this fact to make the
vertical lines of our grid. Think of the colored bar as the first
row of the picture. The vertical bars are produced by extending the
violet areas down the rest of the image.
But notice this: the bars appear just where the remainder is less than
two. This means that we can fix our modifier to have just
vertical bars by coloring only the pixels where the modulus of
the column number is less than two.
Now, the diagram uses the remainder after dividing by eight, so the
remainder starts over every eight pixels. For our modifier, we will use
20 instead of eight so the bars are spread out a bit more.
Proceed as follows:
- Since you don't want to recolor every pixel, put the three
assignments inside an if. The if construct is an example
of a control construct. Control constructs decide how many
times another instruction is executed. In this case, a yes or no
decision is made. Edit the modifier to look like this:
def each_pixel(pix, row, col):
if this column is part of a vertical stripe:
pix.r = ...
pix.g = ...
pix.b = ...
(Of course, the pixel values should be assigned as as before to create
the violet color. The condition will be replaced shortly with
something the computer understands.)
- You will need to indent your existing assignment statements as shown.
This is how Python knows which instructions the control construct
actually controls.
- Now, Python does not understand
the phrase “this column is part of
a vertical stripe.” But we can write something that it does understand
which means the same thing. Change the test to ask
if col % 20 < 2:
The % symbol means “modulus” or “remainder.” The test is asking
if the remainder, after dividing the column number by twenty, is less than 2.
As you can see from diagram above, this will select only those pixels which
reside on columns spaced twenty pixels apart, two pixels wide.
- Save your modifier. Reload the original image and try your modified
modifier. You should get something like
that on the left.

The third step is to add the horizontal lines. This is done by extending
the test to mean “if the pixel is on a vertical line or a horizontal line.”
Python understands the word or, so it is possible to update
the test like this:
if col % 20 < 2 or ... :
Just replace the
... with the test of the row number.
The modifier will now
turn pixels violet if they reside on either a row or a column.
Update your modifier,
test it, and make any needed corrections, so that you get the
gridded image shown above at the right.
When you have your modifiers ready, use the export function to save them
on the desktop. Right click on each button, and choose the Export operation
from the menu. This brings up a file save dialog that will let you save
your modifier on the desktop. Save them, then send them to your
instructor.
The form has spots for each of the required modifiers, and
one extra in case you create something else you just like.
If you have some extra time,
experiment with your grid modifier.
You can right-click and choose Clone to copy a modifier. You can then
experiment on the copy without losing the original.
Here are a few things
you might want to try:
- Change the modulus or colors so the horizontal and vertical
stripes are different.
- Or change colors so that the stripes going the same direction
have different colors.
- Make the color of a horizontal stripe depend on the
column number, so that it changes as you go. You can make either
gradual or abrupt changes.
- Modify the colors of the areas between the lines so the picture
seems to be viewed through a panes of various colors.
The first one is a variation on grid modifier where the color of the
vertical and horizontal bars differ, and the
horizontal bars vary in color based on the column number. This
particular example uses the sin function to get the gradual,
periodic change. You need to say
import math at the top
of your modifier, then you can use
math.sin(r),
where
r is a number in radians, to
compute a sin. Use an expression for
r based on the column number,
then use the sin to set the color.
The second one computes the grid as in the lab, but also
modifies the colors in each square between the grids.
For each pixel, the modifier uses the modulus to find the coordinates
of the upper left corner of the square which contains that
pixel. It then uses the coordinates to compute some arbitrary change
in each level. The change is between -35 and +35. By basing the
change on the coordinates of the upper left corner, the modifier
make sure each pixel in the square is changed the same way.