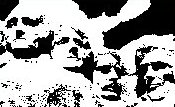
 Create a modifier which enhances the contrast of an image. The
idea is to spread out the values of the pixels so that they occupy
a wider range. This tends to make bright pixels brighter and dark
pixels darker, thus improving the contrast of the image. The diagram
at the left explains how the pixel values are modified.
Create a modifier which enhances the contrast of an image. The
idea is to spread out the values of the pixels so that they occupy
a wider range. This tends to make bright pixels brighter and dark
pixels darker, thus improving the contrast of the image. The diagram
at the left explains how the pixel values are modified.
Pixels less than 30 are reduced to zero. Pixels above 225 (which is 255 − 30) are changed to 255. In the range from 30 to 225, pixel values are spread out to fill the range from 0 to 255. The diagram shows several example levels at the top, and where they map on the bottom. This improves the contrast of the image by spreading out the central pixel values to cover a larger range. For levels in the range 30 to 225, the following formula is used:
|
Here is a python function which makes that transformation:
Some notes about the Python version of the formula: The round operator is a function provided by the system which rounds to the nearest integer value. Of course, 195 = 255 − 30 − 30. The fact that the constants 255 and 195 are given as 255.0 and 195.0 matters. We'll talk about why in lecture.
So do this:
Our contrast modifier assumes that the pixels we are interested in have levels in the range 30 to 225. Will this work well on an image that starts out very dark or very light?
A more thorough version would first analyze the levels in the picture, and then compute low and high cutoff values which reflect the actual image. For instance, the program might set limits such that 3% of the actual pixels are below the low limit, and 3% above the high. If the image is dark, the range will be shifted to the low end, say 10 to 190. This would do a better job of contrast improvement in a dark image than our limits of 30 to 225.
Our contrast modifier computes each color without considering the brightness of the pixel as a whole. Is that reasonable?
 For our second modifier, we'll
place a pure blue border, five pixels wide, around the picture. The
modifier for this is much like the one for the bars from the last
lab. The following is not the modifier, but is an English
expression of what it needs to do:
For our second modifier, we'll
place a pure blue border, five pixels wide, around the picture. The
modifier for this is much like the one for the bars from the last
lab. The following is not the modifier, but is an English
expression of what it needs to do:
You should by now be able to figure out how to make a pixel blue. The new part is translating the if test to Python. First, recall that the border is five pixels wide, so when the test asks if a pixel is “near” something, it means five pixels or fewer away: within the border width. So the test that a pixel is near the left is just col < 5. Since the column number is always a non-negative integer, that means the the pixel must be in column 0, 1, 2, 3 or 4.
The left-most column is always zero, so we can test for leftness by just seeing if the column is small. The number of the right-most column always changes with the image size, but the modifier program tells us what we need to know. There is a pre-defined variable width giving the width of the image, so the right-most pixel is always in column width-1, so the five right-most columns are width-5 through width-1. We can see if our pixel is among them (on the right) with the test col >= width-5.
The tests for the top and bottom are similar, except that you are testing the pixel's row number, and you need to know the number of the bottom row of the image. The pre-defined variable height will be helpful. Substitute mathematical versions of the four tests (keep the words if and or, and the colon), and substitute the correct assignments to turn the pixel blue, and you will have a fine border-creating modifier.
When you have your modifiers are ready, use the export function to save them on the desktop. Right click on each button, and choose the Export operation from the menu. This brings up a file save dialog that will let you save your modifier on the desktop. Save them, then send them to your instructor. The submit form has spots for each of the required modifiers, and one extra in case you create something else you just like.
If you have some extra time, here are a couple of interesting challenges:
The bevel is a nice effect. This one is ten pixels wide, consisting of four trapezoidal areas along the image edges. The upper area is brightened by 60, and the bottom one darkened by 60. The right area is lightened by 30, and the left one darkened the same amount. This creates the illusion of a 3-d object by assuming a light source above and a little to the right: the top edge is brightened most, the right a bit less, and the left and bottom are in shadow. The code has a series of if tests which figure out if the pixel is within one of the four regions, and lightens or darkens it appropriately. These tests are similar to the ones for the border, but they are more difficult, since you must separate each area completely. The four border areas overlap in the corners, but it's not a problem to turn each of those pixels blue twice. Darkening or lightening must be done exactly once.